What you need to do for your beehive winter preparation, depends on where you live. I live in upstate NY and we have some cold winters with a fair amount of snow and wind. This is what I did with my beehives this winter, and listed are some other options you have.
Langstroth beehive winter preparation:
The biggest challenge with beekeeping in the winter is dealing with the moisture that builds up in the hive. Many beekeepers say, “It’s not the cold that kills bees. Wet, cold bees die.” I have heard about several methods for winterizing bees because it’s a big topic of discussion locally. It’s talked about at meetings and there are a few different winterizing classes offered nearby.
The biggest concern is dealing with the moisture that the bees generate inside the hive. If the moisture rises and condenses on the “ceiling” above the bees, it will drip back down on them and they’ll freeze. If you keep the sides cooler than the roof, then the water may condense on the walls and run down the inside of the hive walls, leaving the bees dry.
So winterizing hives often focus on absorbing moisture and keeping the roof or area above the bees insulated to prevent condensation there. Cold winds blowing through a hive are not ideal, although the bees do need ventilation. Here are a few of the ideas I’ve heard and what I’ve personally decided to do with them: (Photos follow the list below.)
- mouse guard (place in Fall) – you can purchase metal ones with holes from beekeeping supply companies but local beekeepers tell me the bees have trouble cleaning out the dead bees through these, 1/4″ hardware cloth will keep 100% of the mice out but the small size makes it difficult for bees to bring out their dead and the bees are a little slow getting through, 1/2″ hardware cloth may allow a rare mouse to squeeze through but it’s a lot easier for the bees to get in and out compared to the first two options – cut and place the mesh so the tines face down then the bees don’t have to step over the wire – I use 1/2″ hardware cloth
- reduce lower entrance size (do this in Fall) – I reduced mine as the bees became less active
- provide upper entrance (in the winter) – this allows bees to go out for cleansing flights and eliminate on warm days even when snow is covering their lower entrance [caution leaving upper entrances open in the Fall as hives may have trouble with robbing if they are trying to guard too many entrances] this winter, I used notched inner covers and notched shims for upper entrances
- install bottom board observation trays if you have screened bottom boards – this will reduce the amount of wind blowing through your hive – I did this
- strap hives – keeps hive covers from blowing off, rocks or cement tiles (that’s what I have) can slide off as snow melts, freezes and melts again – I strapped my hives
- turn the inner cover notch down facing the front of the hive – this forces air to travel along the front face of the hive, if the notch is up, the air will circulate from the lower entrance, up through the center of the hive [and the cluster] and out the inner cover central hole before it can exit the inner cover notch – I turn my notch down in late Fall
- windbreak – my bees are exposed to strong winds coming across big fields at them and so I put up metal “U” stakes and strapped on some landscaping fabric about 3 feet from them
- wrap hive in tar paper – this cuts down on wind blowing through the hive and the black paper helps increase solar gain and warm the inside of the hive a little bit – the argument against this is that cycles of warming and cooling may make the bees eat more and go through their stores faster, but I think it’s cold enough in our area, that the little extra heat might help the cluster warm-up to move to their honey – this is what I did
- wrap hive in Tyvek or other house wraps – this would cut down on wind through the hive, but you don’t get any solar gain – I did not do this
- wrap the hive in rigid insulation – this would cut down on wind through the hive, but you don’t get any solar gain and it’s like you’ve created a “cooler”, the insulation is going to slow the hive from warming up from the outside, although the bees can warm it up from the inside once they start raising brood and their body temperatures go from 42º to 98º F (5º to 36º C) or so – I did not do this
- quilt box – a quilt box above the bees contains some organic material to absorb moisture from the bees below, some people use a metal window screen or 1/8″ hardware cloth stapled inside the lower part of a hive body and fill the hive body with leaves or shavings or cloth scraps, etc. I placed an upper ventilation screen above the inner cover, a hive body above the screen, placed a dollar store laundry bag full of pine shavings in the hive body, and then an outer cover on top of that
- newspaper and Reflectix – you can fold up sheets of newspaper and place them on the inner cover around the central hole, these will absorb moisture (you may want to replace them partway through the winter with dry newspaper) on top of that you can place a piece of Reflectix thermal insulation to insulate the top of the hive – I did not do this
- Homasote board and rigid insulation – the Homasote will absorb moisture and the rigid insulation will insulate the top of the hive. I purchased mine pre-cut by Hudson Valley Bee Supply, but you can purchase the material from home improvement stores and cut them yourself. My Homasote has a dado or groove cut in it to allow some upper ventilation. I decided last minute to run quilt boxes and I threw the Homasote and insulation on top just because I already owned them.
- feed if needed – late winter/early spring is when we suffer our greatest losses in our area as hives die from starvation, you need to check your hive and if the cluster is all the way at the top, feed dry cane sugar or fondant, dry sugar will also help absorb moisture and then turn hard – I fed dry sugar Mountain Camp style
- turn off your electric bear fence once the snow touches it, dig it out in the Spring and turn it back on when you suspect bears will start roaming again – I did this
It’s interesting that in late winter when I inspected the Langstroth hives
the Homasote was damp even when the quilt box’s pine shavings were dry. So maybe in this area with our long winters, a quilt box isn’t enough.
For Example, A bottom entrance on a Langstroth hive usually allows several bees to come and go. A piece of 1/2″ hardware cloth is held in place over the entrance by push pins. The tines point down towards the landing board.
This is the larger Langstroth hive (hive A if you’re following along) in the Fall when the mouse guard was applied. Note the tines are down so bees can walk in and out without having to climb over a wire. I left them a pretty big entrance, but with such a large population, they were easily able to defend it from robbing in the Fall. There is a windbreak in the background which is to the north of this hive – landscaping fabric strapped to metal garden “U” posts.
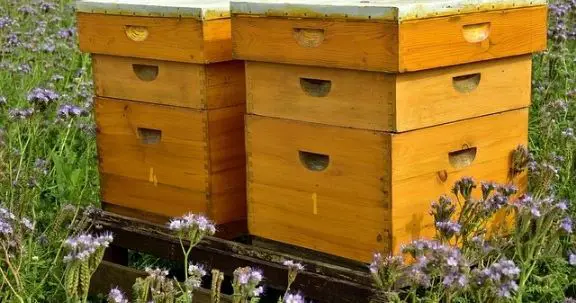
Also, it allows many bees to come and go from a lower entrance on a Langstroth hive that has a 1/2″ hardware cloth mouse guard and a tar paper wrap.
This is the larger hive, hive A after their tar paper wrap was applied. (Looking pretty ghetto here with the blue label – I changed it out later to be more photogenic). You can see how busy their lower entrance is on a warm day. Note the white bottom observation board is in place: I left them in over the winter to reduce wind through the screened bottom board.
When it comes to hive B, the smaller Langstroth hive. They have a smaller entrance and it’s pretty crowded on this warm day. They have had a mouse guard applied, a tar paper wrap installed and they have their white bottom observation board in place. You can also see the landscape fabric windbreak off to the west, in the background in this photo. (Random: I love that bee’s shadow on the tar paper.)
Hope this helps give you ideas for winterizing your beehives if you live somewhere with cold winters. And if you do, good luck!!
Happy beekeeping everybody!!